How to claim your website on Pinterest
Amit Gandhi Pinterest is the place to be to do content marketing for your website or blog. Pinterest has the ability to drive an insane amount of traffic to your website. If you are a business, an important step is to show the world you are legit by claiming and verifying your website on Pinterest.Why should I claim my website on Pinterest?
Claiming your website on Pinterest is a very important step on your way to driving crazy traffic to your website. You need to have a claimed (and verified) website before you can apply for Rich Pins on your site. You need a claimed website to also gain invaluable analytics from Pinterest about how pins are doing sending traffic to your website. This data can be used to make critical decisions on how to build and target your future pins to drive more traffic.
Claiming your website signals to Pinterest that you are a legitimate business, and that Pinterest should start distributing your content to other Pinners. Thereby helping building out your brand awareness and making it official.
You website address is displayed prominently on your Pinterest profile, and your pins will be displayed with your business name and logo.

Claimed Website
How to Claim your website on Pinterest
Claiming your website is easy and doesn’t require any coding. First you will need to make sure you have a business account. You can read my how to guide to upgrade or set up a Pinterest Business Account here.
According to the official Pinterest documentation,
To claim your website, you’ll need to add a meta tag or upload an HTML file to your website’s HTML code.
I prefer to go the meta tag route, but either way works fine.
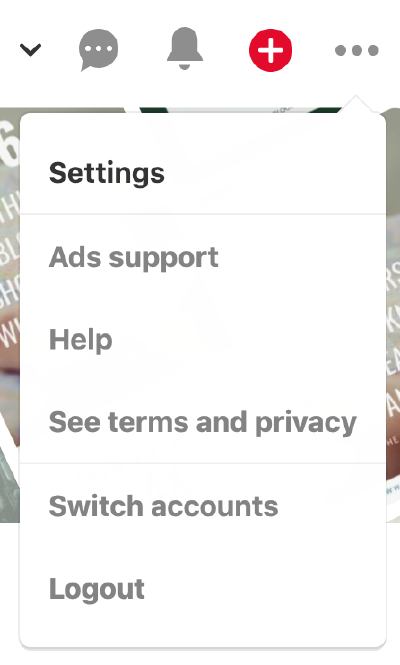
Start by clicking on the ... and go to Settings.

Settings
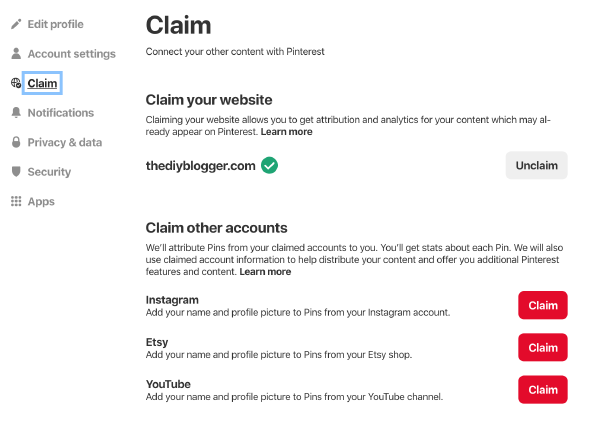
You will see a Claim option in the left hand menu. Click that and you should see a page to claim your website.

How to Claim a Website on Pinterest
In the image above, I have already claimed my website. If you have not claimed yours yet, then you will have a text box to enter your url, and then click on the Claim button.
Choose if you want to claim by an HTML tag or using an HTML file.
Claiming with an HTML tag
If you choose to claim with an HTML tag, you will need to have access to the source code for your website. You can also use the Yoast SEO plugin for Wordpress to manage the meta tag for you.
When you select the HTML Tag option, Pinterest will give you the meta data that you need to copy and paste into the <head> section of your html code.
<meta name="p:domain_verify" content="32586c70c7c42eb964eacdf69d0cb90e"/>
Note - don’t copy paste the value above as that wont work for you. Its just an example. Use the one Pinterest gives you.
Go back to Pinterest and click Submit.
Claiming with an HTML file
If you choose to claim with an HTML file, you will need to download the file Pinterest provides you when you select the HTML file option.
Upload that file from Pinterest to the root of your website.
Go back to Pinterest and click Submit.
Once you have hit Submit, it usually takes between 10 minutes to an hour to verify. Although allow up to a day per Pinterest guidance.
Once your site has been claimed, you can remove the HTML tag or file. Only making changes to your website in your Pinterest settings will remove the claim.
You will also now have access to website analytics which is an extremely useful tool for measuring impressions and engagement of your pins on Pinterest.

Pinterest Analytics
Claiming Your Website with Squarespace
In the Home Menu on your Squarespace admin panel, click Settings
- Choose
Connected Accounts - Choose
Connect Account - Choose
Pinterestfrom the Social Accounts menu. - Log in using your Pinterest username and password.
- Click Allow to authorize the connection between Pinterest and your site.
That’s it! Your website should now be claimed on Pinterest! It could take up to 24 hours, so give it some time. Usually its only a few minutes though. When its working, your profile should show a globe with a check mark on it.
Claiming Your Wordpress Website
The easiest way to verify your website for Pinterest in Wordpress is to use the Yoast SEO plugin (which I strongly recommend for SEO anyway).
- Visit SEO > Social in your Wordpress Admin area.
- Enable Opengraph in the Facebook settings.
- Go to the Pinterest tab, and paste in the meta tag that Pinterest provides you with (see above).
- Save Changes.
- Go to Pinterest and click Submit to verify your website.